Ensure you have already created an agent.
To configure an agent, click the pencil icon for the agent you’d like to configure from the agents screen.

Agent details #
You can update the agent’s name and short description here. These are not shown to students who chat with the agent.
The Information for users is shown when a student initiates a new conversation with the agent. For example, a setting like below:

Configuration screen

What the student will see
Prompts #
The System message is very important and controls and steers your agent. Learn how to design a good system message.
You can also specify Conversation starters to help your students kick off a conversation with your agent.
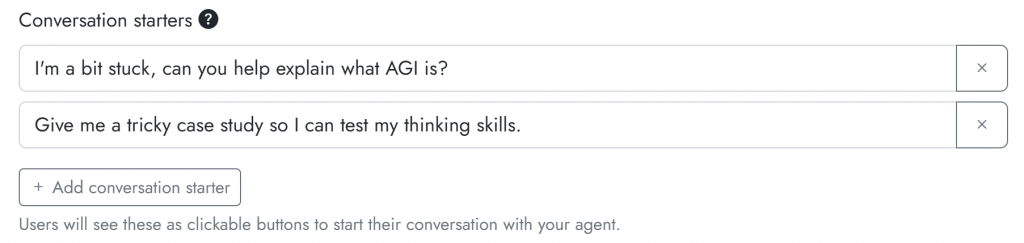
These will appear as buttons on top of the chat box at the beginning of a new conversation with your agent. For example:

AI engine #
The Temperature controls how creative the AI is. A setting of 0.7 is typical. Higher temperatures tend to make the AI more creative/random, whilst lower temperatures tend to make the AI more deterministic and predictable. The best way to get the right temperature is to experiment.
The AI model is the underlying ‘engine’ that drives the generation of responses. Different options will appear here depending on what is enabled for your organisation. For example:

GPT-4 models are much more powerful (but also more financially and computationally expensive) than GPT-3.5. If your agent needs to have stronger reasoning abilities, then pick GPT-4, if this is available. GPT-4 is also better at following the system message.
Resources #
Agents can be equipped with text-based resources. These resources can help to ground the agent’s responses. For example, you could provide it with your syllabus document, or a specific reading that your agent should refer to, or documentation for an assignment. It’s important to understand how agents use resources.
To add a resource, click the Add resource button.

Web page #
You can provide the URL to a publicly accessible web page. If you would like Cogniti to try and follow links from that page, enable the Recursive option.
File #
You can provide a PDF file or DOCX file (more formats coming soon).
Canvas resource #
If this is enabled for your organisation, you can connect Cogniti with your instance of the Canvas learning management system to draw resources directly from your Canvas courses, such as pages, files, assignments, and rubrics.
Knowledge #
Agents can be equipped with text-based knowledge. These are distinct from resources. The amount of knowledge that can be added will depend on which AI model is selected, and the amount of input that AI model can accept. As distinct from resources, information that is provided through knowledge are wholly sent to the AI engine each time it considers how to respond to a student’s prompt; see: What is the difference between agent resources and knowledge?.
To add knowledge, click the Add knowledge button.

Similar to resources (above), you can add publicly-accessible web pages, upload files, and Canvas resources (if enabled for your organisation). Because knowledge takes up much more of the input capacity of the AI engine, Cogniti will show an environmental notice depending on the size of the information provided through knowledge, such as:

Limits #
You can set limits to how your agent operates and how users can interact with it.
Limit the length of user prompts: You can limit the number of words that users can enter for each message.
Limit the length of AI completions: You can cut off the AI after a certain number of ‘tokens’ (a token is approximately 0.7 of a word). Note that this may lead to abruptly-terminated AI messages. A better way to specify a length limit for AI completions is to provide an instruction in the system message such as “Limit your responses to 100 words.”
Override number of chat messages allowed per hour by each user: Your organisation will have set an hourly limit for the use of the AI models, to reduce overuse and abuse. If you wish to reduce the limit further, you can do so using this setting. Note the limit will not exceed what is set for your organisation.
Chat access #
Here, you can set who is allowed to chat with this agent.
You can also obtain a secret link that will take a logged-in user directly to the agent’s chat interface to start a new conversation.
See how to give students access to your agent.
Plugins #
If enabled for your organisation, plugins are available to modify how agents perform.
- LaTeX formatting to render mathematical formulae
- Speech recognition and synthesis so that agents can ‘listen’ and ‘speak’
Attachments #
If enabled for your organisation, enabling attachments for your agent allows students to upload documents in addition to typing into the chat box. The uploaded attachments in a conversation will be considered by the agent while it responds to the student.
Sharing #
Here, you can set who can edit/administer this agent, as well as who can find/deploy the agent and make a copy of it. Check out the options available to you around sharing.
Ownership #
If you wish, you can change the owner of this agent to someone else in your organisation. Note that if you are not an owner, and you are not in the list of people who can edit and administer the agent (set in the Sharing tab), you will lose edit access to the agent.


